Paper Mache Skull Questions
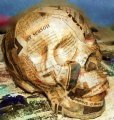 Your old pal Spook gets a lot of mail from folks who, having tried their hand at making a paper mache skull, can’t seem to de-mold the copy without tearing it, poking holes, or jamming a screwdriver under a thumbnail. This makes for a generally unpleasant experience all around.
Frustration is a key ingredient in all sorts of FAIL, to which I attribute some dented trash cans, a collection of snapped dowel rods, and half a dozen tool-shaped holes in the walls of my garage. The following note on the subject, recently hurled in our direction, is … illustrative.
“you need to give alot more info on your paper skull instructions. this method doesn’t work…you can’t get the paper off the skull afterward which ruins it, and the paper doesn’t even remotely resemble a real skull. either you’re leaving out some important steps/tips, or else this is just a big waste of time & cash.”
Hm. Vinegar, mixed with a little oil, makes a nice salad dressing. Spray it on your garden, and you’ll wipe out all the tomatoes.
While I’m not inclined to be overly helpful to this person (Grumble wanted to write today’s post), there are other folks who might be experiencing similar issues with their paper mache skulls, so I updated the project page with some further, possibly helpful, tips.
- Use a release agent like WD40, wax, spray silicone, or anything slippery that won’t melt your skull and burn the skin off your fingers. (Ask a classical guitarist to play any AC/DC song for a good visual of what I mean.)
- Use a very thin glue for the first paper layer, or try just water and no glue at all.
- Apply several paper layers, or your copy won’t be strong enough to survive de-molding. You can add up to three layers in one session. A fan helps with drying. Feel free to apply more layers, but allow ealier layers to dry first.
- Pay special attention to the eye sockets and nose cavity. Overlap long, thin strips, adding extra coverage from the center out to eye ridges, cheek bones, etc.
- Don’t try to de-mold until the copy is completely dry.
- Slice your copy into three pieces, or try a different pattern if mine has not been successful for you.
- Break the seal around the base of the skull and jaw bone by carefully prying, or cutting, the paper edge from the form. Work slowly, and go all the way around.
- Slip a small flat-tip screwdriver or butter knife under an edge and carefully work it around to peel the paper from the form. Concentrate on one area until it lifts away.
We enjoy corresponding with all haunters. If you have a story to share, a question for the team, or would like to offer constructive criticism, the Undead Letter Office is open 24-7. All other correspondence is subject to our Grumble Filter.

 Living near Louisville, Kentucky doesn’t only mean that we have more than our fair share of zombie outbreaks




 Grumble say if can’t convince a dog wag his tail, then better examine conscience. If that not work, give steak. Still not work, get cat.


