Mrs. Spooky Blue challenged me to build corpse number 3 (Sam) to look as if he were crawling out of his grave. With only a week before opening night, and with tombstones yet to build (do NOT sell all your tombstones at a yardsale, no matter how much money they bring ... money isn't everything), I said, "no way," and was hell-bent on sticking with the same design we used for Harold (corpse number 2). It was a tested design. It worked. Why invite disaster?
Sigh. Here is Sam. The torso follows a radically different design than Harold's. Instead of an upright armature, I made a sort-of doorstop out of 2x4 scraps. To this I attached the ribs and other rolled-up-newspaper-bones. You know what? It looked awesome. If you're a guy and you don't have a wife, I recommend you go out and find one. (Love you, sweetie) |
|
| Sam leans forward instead of sitting upright. I added extra support to his neck and arms. The arms actually help to keep him from tipping over. I eschewed hands again since they wouldn't really be visible in the tall grass. If you go with this type of design, take some time to look at a model. Pay attention to what a body looks like crawling or climbing out of the ground. This will add a taste of realism to your graveyard that will easily overcome those stale Payday bars you give out to all your trick or treaters. It's definitely worth the extra effort to see your visitors just stand and stare, horrified, unsure if it's really worth a stale Payday to come any closer. |
|

|
|

|
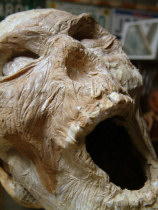
I like carpet latex. It's cheap. It's really sticky. It dries fast, and maintains its shape very well. Plus, I learned a new trick - corspe-sculpting.
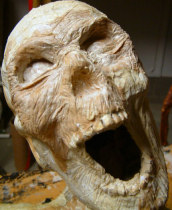
After you've layed down your final skin layer, try this. While the latex is still wet, use a toothpick or a screwdriver to push the skin around to form wrinkles. Dig pits, draw crow's feet around the eyes, drag lines across the lips. Latex-saturated paper towel is really pulpy and can be formed into all sorts of nasty blemishes. These remain when the latex dries!
Add extra bits of latex-towel-pulp around the eye sockets and pinch it to form eyelids, drooping skin layers, or whatever grossness you can think of. I especially enjoyed adding eye ridges. I dug an angry, furrowed brow with just a few strokes. You'll need two or three layers of "skin" to really take advantage of this technique, but once you see how easy it is to add these details, you'll wonder where the time went. |
| Adding eyeballs is easy, too. Just wad up some news paper and shove it into each eye socket. Lay some bits of pulp to form eyelids and sculpt away. Oh yeah ... I painted the eyes white. There's nothing like that milky zombie stare to chill the blood of the audience and warm the heart of the builder when he sees how chilled his audience's blood is. |
|
|
|
|
|