|
Spooky Blue's Halloween Haunt
Projects
|
|
|
|
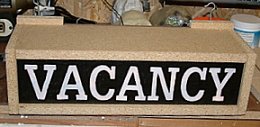
For 2003, we're
adding a crypt/mausoleum to our haunt. Being the
friendly spirits that we are, we thought we'd welcome
prospective specters looking for a home with a nice, lighted
"Vacancy" sign above the door.
|
|
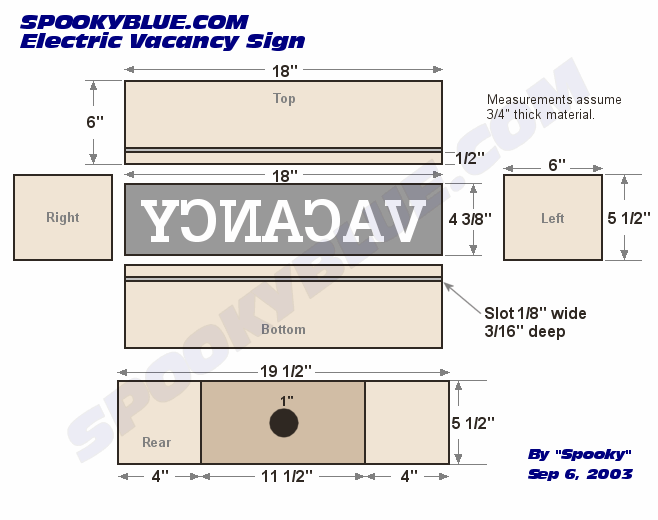
Materials |
Box
I had some 3/4
press-board left over from another project, and it
worked very well. However, you can use practically
anything because all we're really building is a
box. Your dimensions will vary if your material is
other than 3/4" thick, so keep that in mind.
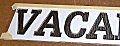
Signage
The signage itself, is cut from a sheet of 3/8"
Acrylic Safety Glazing (plexi-glass). Home Depot
(Haunt Dead-po?) sells several sizes. An
18"x24" sheet was $5.00. I used flat
black latex paint to opaque the area around the text.
Lighting/Electrics
As any DIY haunter knows, you can use practically
anything once you've applied a little imagination.
I used a wad of white xmas tree lights to back-light the
sign. You can just cram 'em in there, or lasso
them together with a few zip ties. Mind the heat,
though. You don't want to place a lot of wattage
into an enclosed space or you could start a fire.
|
|
Construction |
| Use
your favorite graphics program to make the text in
a nice, bold font. Then just print it.
Size the font (or stretch it) to fit inside
18"x4 3/8". Make sure to leave
about 5/8" or so border around the
edges. Since a sheet of paper is generally
only 11" tall, you'll have to print half the
text on one sheet, and the rest on another sheet.
If you're really
good, you can free-hand your text directly onto
the plexi-glass sheet. That would have been
a waste of a lot of perfectly good plexi-glass for
me, so I used PaintShop Pro.
~Click images to zoom in~ |
|

|

|
|
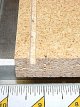
| Plexi-glass!
It can be cut with a table saw, hand saw, or
scored with a razor blade & snapped
(allegedly). |
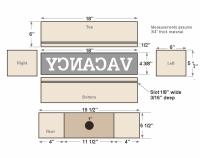
18"
is a perfect length, so cut a piece that was 4
3/8" tall. These measurements need to
be pretty close to make everything fit together. |
Center
your text beneath the plexi-glass sheet and tape
it to keep it from moving around. Use a
Sharpie to trace your text onto the plexi-glass. |
| Opaque:
After tracing your text onto the plexi-glass,
remove the tape. Place a few sheets of white
paper on your workbench and set the plexi-glass
sheet on top. Now you're ready to
opaque. If you want the outer surface of the sign
to be nice and smooth, apply the opaque to the
back of the sheet. This is what I would have
done if I had thought about it in time. I
used plain old flat black latex paint.
When
applying the paint, keep reminding yourself,
"I'm painting around the letters, not inside
the letters." A flat, stiff brush works
well. I found it worked better to dab
instead of brush the paint on. It may take
several coats to block out all the area around the
text. The object here is only to allow light
to show through the text. After the paint is
dry, hold the sign up to a light to see what
areas need more attention. At first you
might think it'll never work, but just keep at
it. If you accidentally get paint inside the
text area, just use your finger to wipe it
away. You can also use a hair dryer to speed
up the drying process. |
|
Click to zoom in
|
Click to zoom in
|
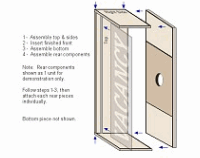
Use
the dimensions and assembly instructions to the
left.
I
used 3/4" hard-board. If your building
material is of a different thickness, you'll have
to adjust a few of the measurements. |
 |
The
plexi-glass sheet is 4 3/8" tall.
The distance between the top and bottom is
4". Cut a 3/16" slot into
the top & bottom. The plexi-glass
sheet fits snugly into the slots, and
there's no light leakage. |
|


Some construction
closeups |
|
Use
wood screws or finishing nails to fasten the
sides. When fastening the back, make sure to
use screws on the center piece (with the hole cut
in it) so that you can easily remove it. You
can even install a hinge. I made my center
back piece from 1/8" hard board, and the
other two back pieces of 3/4" hard
board. This gives the electric cord plenty
of clearance. (Sure
did have a lot of this hard board stuff lying
around) |
|
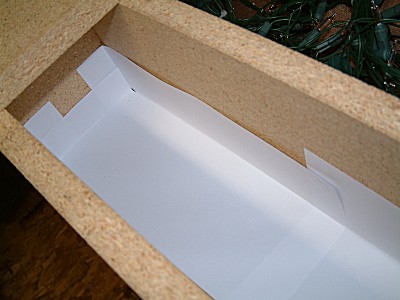
Diffuser:
After assembling the box, place a couple of
sheets of thin white paper in the box and tape to
the sides. This will soften the light.
You can also use theatric gels to make the text
glow a particular color. Once again, be
mindful of using anything that could easily catch
fire. It's pretty warm inside there with the
light on. |

Diffuser material |

 |
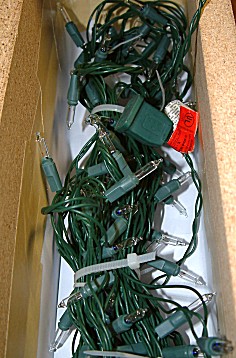
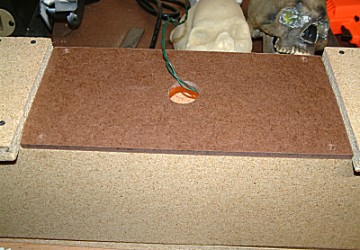
Light:
I made a rope out of a wad of white xmas tree
lights and a few zip ties, then let the cord hang
out the rear. You'll probably need to rasp
out the cord hole or cut it a little wider than
1" so the plug will fit. It might also
be a good idea to drill some holes in the back to
vent the heat. |
| Screw
in some hooks, paint the box (if you like)
and your sign is ready to hang. Let me
know if you end up using this little
project. I'd love to see pix of your
haunt! Happy haunting! |

 |
|
|
|
|