|
|
|
LEDs
kick ass. They come in lots of colors
and they're easy to work with. All you
need is a single AA battery to light one
up. And trick or treaters get really
uncomfortable under the malicious gaze of a
ghoul with red glowing LED eyes.
There
is a flashing variety available that doesn't
need any external circuitry. The
problem is that a pair of flashing eyes
isn't really all that scary. Woooo
they're flashing. Big deal. But
what if you wadded a bunch of them
together? The result is a very
convincing and spooky flickering firelight
effect. |
First official "Spookyfire" device
|
|
| Materials
list |
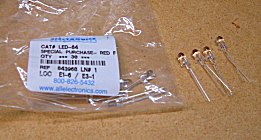
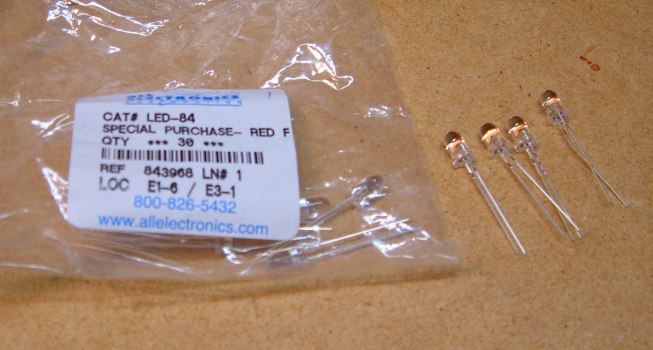
| Flashing
LEDs |
AllElectronics.com
Electronic Goldmine (Updated Links 09/02/2009 - Please report dead links) |
| Switch |
SPST slider - AllElectronics Assorted switches - Electronic Goldmine |
| 2
or 4 battery box |
2AA-cell battery box Assorted battery boxes - Electronic Goldmine |
| Hot
glue gun |
You
don't already have one?
Stanley GR25 Trigger Feed Dual Melt Glue Gun (Nice) Dremel 1200-01 Glue Gun Kit (Drool) |
| Before you begin ... |
If you've never played around with LEDs before, it will be worth a few minnows of your time to read up on the subject. Here are some links that should help.
Circuitry 101 - How to hook up LEDs Current limiting resistor calculator (for LED circuits) LED projects & reference - at Instructables.com
|
| The
"spookyfire" effect |
|
Click
pix for a larger view
|
A
single flashing LED is kind of neat to
watch. Especially if you're semi-autistic or
have spent many years working with (and breathing
the fumes of) industrial adhesives. If one
flashing light is cool then 4 LEDs all flashing at different
times ought to send you into seizure.
Place a
spookyfire "blob" inside a pumpkin, a
skull, or anything that would look cool if it were
lit with a guttering candle. This effect
works great as an indirect light source, but is
lessened if you can actually see the blob.
The reflected, totally random flicker makes an
extremely convincing firelight effect, is very
portable, and totally safe. |
| Construction |
"Blob
- n : an indistinct shapeless form ~ WordNet � 2.0,
Princeton University"
That pretty much describes this thing to a
tee. |
|
|
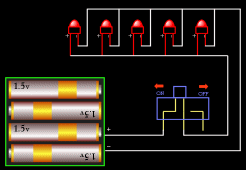
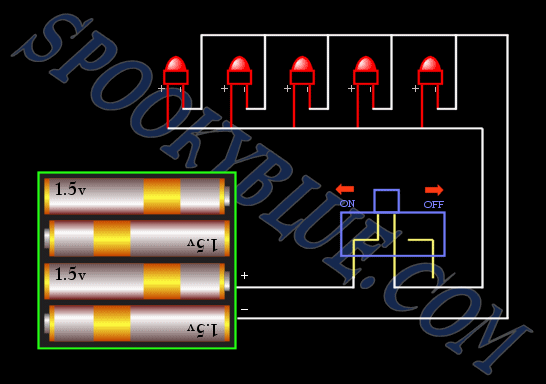
Our
circuit diagram to the left shows what the
blob would look like if I were an
engineer. The actual circuit is shown
on the right.
Basically,
tie all the positive leads together and run
them to the switch. Tie all the
negative leads together and run them to the
negative terminal of the battery box.
Note: Seasoned electronics gurus will immediately note the lack of any kind of current limiting resistor. Strictly speaking, there should probably be a 150 Ohm resistor added to one leg of every LED to drop extra voltage in the event that that LED is the only one drawing current for a given instant. Since there are usually two or three LEDs lit at once, munching up all those Volts, I left it out. If that bugs the hell out of you, then now you know how to fix it. |
 |
|
Run the
other side of the switch to the positive
terminal of the battery box, and there's
your circuit. Mount the switch and
LEDs to the back of the battery box with hot
glue.
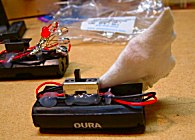
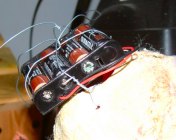
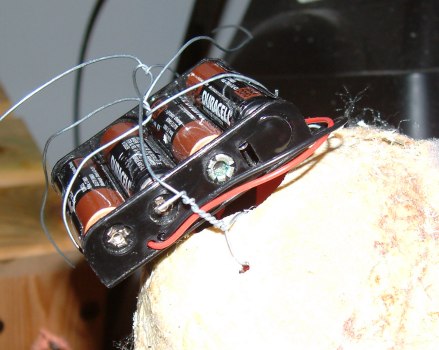
You'll
notice that the above photograph doesn't
match the circuit diagram. That's
because I already installed the larger blob
in a corpse skull. Just drill a hole
in the back of his head large enough for the
LEDs to fit and use stout wire to hold the
package in place. Some cobwebs will
hide the assembly, and cobwebs stuffed
inside the skull will hide the blob while
reflecting its light. The smaller variety
(2 battery box) can
fit right inside a skull. |
|
|
You can
also add a piece of cloth to the blob as a
diffuser. This is handy if your blob
will be in plain view and you don't want
visitors to see all the pretty flashy lights
inside. Just wrap a piece of cloth
around the LED mass and tack together with
hot glue.
A
diffuser can be nice but it will reduce the
amount of light the blob puts out.
Better to place it somewhere out of sight
and use its reflected light (off the inside
of a skull or pumpkin, for example). |
|
|
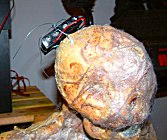
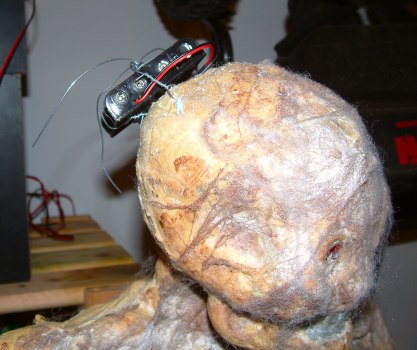
Here is
another shot of the blob starving to death
trying to suck the brains out of a
corpse.
If
you're not crazy about a mass of electronics
poking out the back of your prop then don't
mount the LEDs to the battery box.
Instead, run long wires from the LEDs to the
box and tuck the box and switch away
someplace inconspicuous. |
|
|
I know
what you're thinking. This thing must
look like a Christmas tree or a robot from
the old Buck Rogers television show.
Looking directly at the blob, you're
right. It's the reflected light
that is so intriguing to watch. As the
LEDs randomly fire the overall glow varies
in intensity, making the light flicker and
dance. What's really interesting is
that there is nothing abrupt about it.
The light will seem to flare from time to
time, then calm down, then look like it's
about to go out. There are no
repeating patterns, and it's pretty neat to
watch. Here
are three video clips of a test rigged
corpse. Have fun haunting!
|
|
|
Additions, improvements, & comments |
|
Gary
Adams (Otaku): I put a 150 ohm resistor on
the non-flashing LED. I found that it was drastically overheating (a green LED
should not glow orange and burn your fingers). I love this effect, and will
make a couple more to use with the skull piles in the cemetery. Thanks for a
cheap and easy way to get realistic flame effects. |
|
Spookyblue:
You are correct, Gary. Folks, if you will be
adding a non-flashing LED like Nephilim, you should
include a resistor in series to drop the
extra voltage that's going to fry your LED.
If you don't have a clue what I'm talking
about, just solder a 150 ohm resistor in
between the positive lead of your
non-flashing LED and the switch. This
will most likely cover you. Otherwise,
there's this thing called
Ohm's Law ... |
|
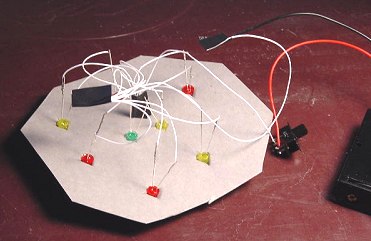
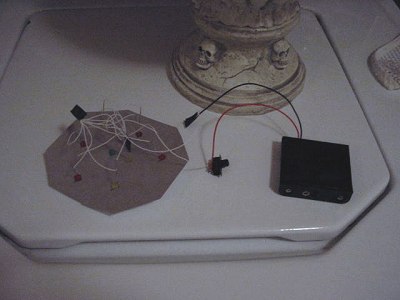
Gary
Adams Spookyfire enhancements (Update 06-03-2005): Gary
has rigged a piece of cardboard to hold his
LEDs and effectively expand the
"blob". This gives him more
control over (and probably increases) the
flicker effect. Here are some photos
of his project: Photo1
Photo2 Photo3
Hopefully we'll have some video of his
enhancement at some point. |
|


